So you want ccmake on Windows?
Let’s think about this scenario.
You work on CMake Windows-based project on Windows machine through WSL.
Although on Windows, you can already use cmake-gui.exe. But you prefer to use command line based solution to configure or generate the project, or quickly adjust options from previously generated CMake project without a need to incrementally execute cmake.exe with bunch of options and lots of flags here and there every now and then. ccmake is the solution here which is available only on Unix/Linux based platform.
ccmakeis literallycmake-gui.exebut a command line incarnation.
The core question is how can we make ccmake also available on Windows ?
Problem
To bring ccmake from Unix/Linux platform onto Windows. It’s not that straight forward or a painless process. ccmake is configured in upstream CMake source code to be checked and built only if it’s Unix/Linux platform.
Not just that ccmake depends on curses or ncurses library. That dependency is available on Unix/Linux platform only as terminal on Windows does not based on the concept of terminfo/termcap.
Solutions
I did initial research and jump right into action. Here is the chronological order of attempts I’ve made so you will get my thought process.
1. Cross-compile CMake with mingw64 for Windows on Linux + pre-built mingw64 version of ncurses (mirror on github) Broken
First attempt was made with assumption that ncurses would work even via cross-compilation to be run on Windows. With a small changes to make CMake compatible and buildable with mingw64, then I was able to cross-compile successfully.
I chose to use a pre-built mingw64 version of ncurses due to a lot of pain need to endure to make it compilable with mingw64. Ncurses developers already did this work, so we can trust that the output libraries are in the best form as it can be.
Result is that I was able to launch it, toggle CMake options here and there, but configuring and generation a project didn’t work at all. It got stuck. Although I tried to debug, but didn’t fully commit to go much further.
Interested users who want to test it out themselves can take my patch for compiling CMake with mingw64 here.
Next I started seeking for alternative implementation of curses/ncurses but on Windows. I came across PDCurses. I was slightly worry that it might not be fully compatible, nor provide all the symbols that would be needed by CMake when we compile the source. But I made an attempt anyway, so it became next approach…
2. Cross-compile both CMake and PDcurses with mingw64 for Windows on Linux. Recommended
Result is great! I feel like it’s a drop-in replacement for ncurses. I was able to launch, select & toggle CMake options here and there, then configure and generate a project.
Although with some effort to patch PDCurses by tweaking its arrow key codes to make it detectable through WSL, and make its Makefile build system able to do cross-compilation with mingw64. So navigating through options would work the same as if users do it directly on command prompt or Power Shell.
I’m satisfied with result of this approach, and most likely to call it a day. But another thought also came up that I should also do a native compilation with MSVC for both CMake and PDCurses. If succeed, then we might be able to remove a thin abstraction that it got introduced due to cross-compilation (if ever any). That thought became the next approach…
3. Natively compile both CMake and PDCurses with MSVC. Work, But much slower
It’s totally painless to build. One thing to note is to build it as static library in order to make it compatible and ease in linking with CMake later.
This means there is no need to specify DLL=Y. Thus the build command would be
cmd.exe /c nmake -f Makefile.vc Check README.md for more detail. But sadly, its performance is much slower than mingw64 version in approach 2 especially it takes longer time in configuring, and generating project significantly. Other than that, they both work fine the same. So it’s clear for me which one to choose.
To reassure slightly more, check README.rst in which it mentions about using mingw as one of a couple ways to build. They wouldn’t list it there if there’s something really broken with cross-compilation process.
Interested users who want to test it out themselves can take my patch for compiling both CMake, and PDCurses with MSVC here.
At last I’m going with mingw64 version.
Chosen Approach
Approach 2 is the best, and recommended way to proceed with what we want to do here. So the guideline you will be seeing next bases on that.
How to build ccmake.exe
So now as we chose approach 2 to tackle the problem. The guide listed in this section is to “Cross-compile both CMake and PDCurses with mingw64 for Windows on Linux”.
I tested this on Windows 10 machine installed with WSL 1 of Ubuntu 20.04. It shoud work fine even cross-compiled on a native Linux.
We will base on CMake’s release tag
v3.20.5as I tested, it’s the highest as possible that is easy enough to do cross-compilation with mingw64. As of this writing, the latest version isv3.21.1.
Pre-requisite
mingw64- install via package manager on Linux (for Debian/Ubuntu, usesudo apt install mingw-w64)cmake- install by downloading Windows version of v3.20.5 (download here)- Upstream CMake source code (via git) - we will use
v3.20.5 - Upstream PDCurses source (via git) - we will use
3.9 - mingw-std-threads (via git) - mingw64 alone still misses thread/concurrency library headers, this will patch that part
- CMake toolchain for cross-compilation with mingw64 via CMake - download here
- My CMake and PDCurses patch here
Next,…
The actual steps are separated into 2 phases
- Preparation phase - prepare each individual dependency
- Finalize phase - assemble altogether
1. Preparation phase
Notice each of <...> is where you substitute your own directory as you have freedom to do git clone, or save pre-requisite resource anywhere in your local machine, otherwise noted.
Prepare CMake
git clone git@github.com:Kitware/CMake.gitgit checkout v3.20.5git apply <dir-to-my-patch>/cmake_v3.20.5_pdcurses.patch
Prepare mingw-std-threads
cd /usr/x86_64-w64-mingw32/include- this is include directory by default that mingw64 toolchain will search forsudo git clone git@github.com:meganz/mingw-std-threads.git
or
Put git repository outside of system include directory, then manually copy all header files afterwards…
git clone git@github.com:meganz/mingw-std-threads.gitsudo mkdir /usr/x86_64-w64-mingw32/include/mingw-std-threadscp -av <mingw-std-threads-dir>/*.h /usr/x86_64-w64-mingw32/include/mingw-std-threads/
Prepare PDCurses
git clone git@github.com:wmcbrine/PDCurses.gitgit checkout 3.9git apply <dir-to-my-patch>/pdcurses_mingw64.patchcd winconmake DLL=Y(DLL=Ytells to build as shared library)cp -av pdcurses.a pdcurses.dll /usr/x86_64-w64-mingw32/lib/cd ..cp -av curses.h curspriv.h panel.h /usr/x86_64-w64-mingw32/include/
Prepare CMake toolchain file for building with mingw64
- Download toolchain file from here then save to your home directory - thanks to ebraminio, and (originally) peterspackman
2. Finalize phase
Again, substitute any <...> to what you actually have e.g. cloned repository, path where you saved the resource on your local machine.
cd <CMake-src-dir>cmake -DCMAKE_TOOLCHAIN_FILE=~/mingw-w64-x86_64.cmake -G Ninja -B _build -S .- You should notice the line saying
-- Found Curses: ...at the near end of output lines. It means it actually found our PDCurses. ninja -C _buildorninja -C _build ccmake.exe
The latter will build faster as it attempt to build only what needed byccmake.execp -av <PDCurses-src-dir>/wincon/pdcurses.dll /mnt/c/Program\ Files/CMake/bin/
Assume you installed CMake on Windows at drive C which is by defaultcp -av <CMake-src-dir>/_build/bin/ccmake.exe /mnt/c/Program\ Files/CMake/bin/cp -av /usr/lib/gcc/x86_64-w64-mingw32/9.3-posix/*.dll /mnt/c/Program\ Files/CMake/bin/
Depends on which gcc version is prioritized to be used on your machine, so take note of9.3-posixthat it might be different. This one usually is optional as we link statically against core mingw64 libraries. But we still copy its corresponding.dllthere living along side the executable binary for safety. Although as checked viadumpbin.exe /dependents ccmake.exe, it doesn’t mention anything regarding to mingw64’s core libraries./mnt/c/Program\ Files/CMake/bin/ccmake.exe --help
You should see no errors. Bunch of help texts should show up./mnt/c/Program\ Files/CMake/bin/ccmake.exe -S "C:\Path\To\Proj\SourceDir" -B "C:\Path\To\Proj\BuildDir"
Test & validate configuring and generation of project.- Done
Bonus: You are free to alias resultant binary to shorten your keystrokes e.g. alias cmake.exe=/mnt/c/Program\ Files/CMake/bin/ccmake.exe in your ~/.bash_aliases.
Result
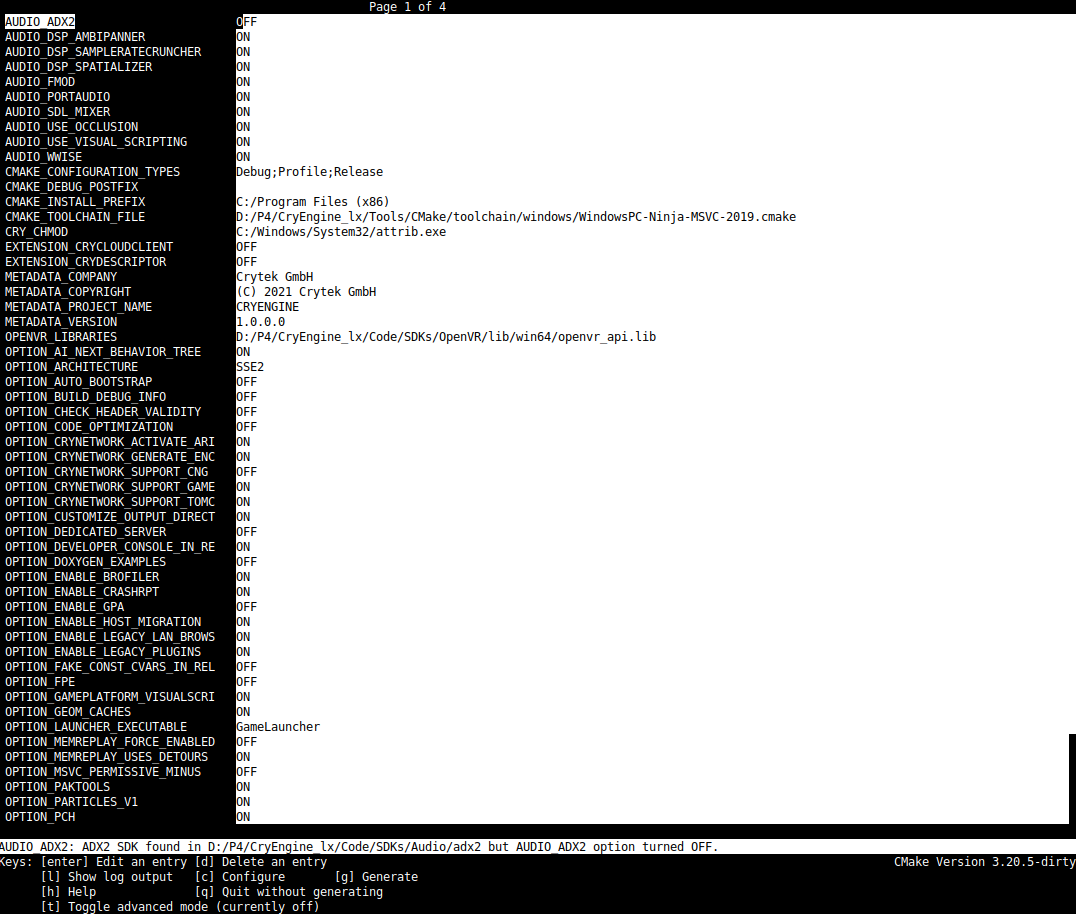
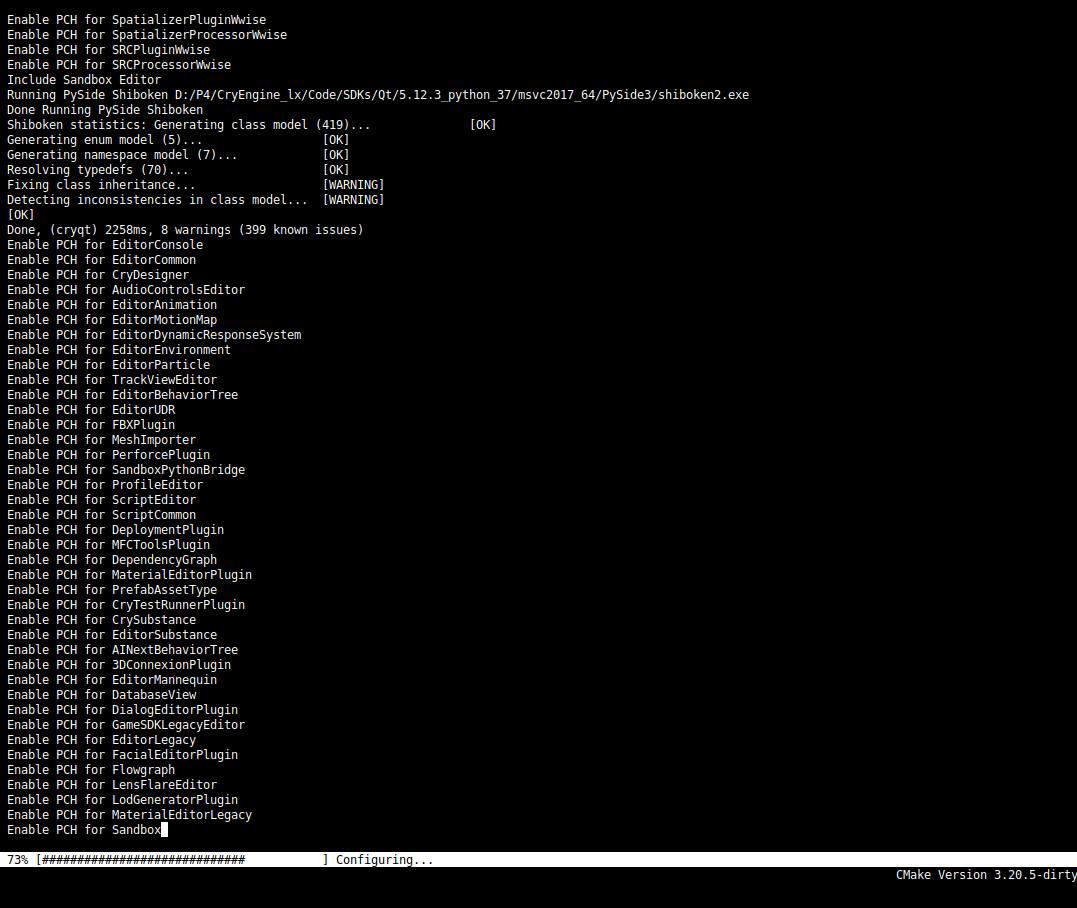
I’m testing this against CryEngine internal development branch. Both of images below result from execution through WSL on Windows machine. For someone that doesn’t have time, I created an archive of pre-built ccmake.exe from above workflow ccmake_mingw64_pdcurses_dist.tar.gz.
Nothing secret or accidentally exposed in the screenshot below :)
Click for enlarged version.
First published on August, 9, 2021
Written by Wasin Thonkaew
In case of reprinting, comments, suggestions
or to do anything with the article in which you are unsure of, please
write e-mail to wasin[add]wasin[dot]io
Copyright © 2019-2021 Wasin Thonkaew. All Rights Reserved.